

How To Animate Character Modles In Unity
Creating a new Animation Clip
Animating a GameObject
Once you lot have saved the new Animation prune Asset, you are ready to begin adding keyframes A frame that marks the start or cease point of a transition in an animation. Frames in between the keyframes are called inbetweens.
See in Glossary to the clip.
In that location are ii singled-out methods you lot tin can use to animate GameObjects The fundamental object in Unity scenes, which can represent characters, props, scenery, cameras, waypoints, and more. A GameObject'southward functionality is divers by the Components attached to it. More info
See in Glossary in the Animation window: Record Mode and Preview Mode.
Record Mode. (Also referred to as auto-cardinal style)

In record way, Unity automatically creates keyframes at the playback head when you motility, rotate, or otherwise modify whatever animatable property on your animated GameObject. Press the button with the cerise circle to enable tape mode. The Animation window time line is tinted cerise when in tape mode.
Preview Fashion:

In preview mode, modifying your animated GameObject does not automatically create keyframes. You must manually create keyframes (run into beneath) each time you lot modify your GameObject to a desired new state (for instance, moving or rotating information technology). Press the Preview button to enable preview manner. The Animation window time line is tinted blue when in preview fashion.
Notation: In record way, the Preview button is also active, because you lot are previewing the existing animation and recording new keyframes at the same time.
Recording keyframes
To begin recording keyframes for the selected GameObject, click on the Animation Record button. This enters Blitheness Record Manner, where changes to the GameObject are recorded into the Animation Prune Animation data that can exist used for animated characters or simple animations. It is a unproblematic "unit" piece of motion, such equally (one specific instance of) "Idle", "Walk" or "Run". More info
See in Glossary .

Once in Record mode you tin can create keyframes by setting the white Playback head to the desired fourth dimension in the Animation fourth dimension line, and and so alter your GameObject to the state you desire information technology to be at that indicate in time.
The changes you make to the GameObject are recorded as keyframes at the electric current fourth dimension shown by the white line (the playback head) in the Animation Window.
Any modify to an animatable property (such every bit its position or rotation) will cause a keyframe for that property to appear in the Blitheness window.
Clicking or dragging in the time line bar moves the playback head and shows the state of the animation at the playback head'south current time.
In the screenshot below yous tin see the Blitheness window in record mode. The time line bar is tinted cerise, indicating record mode, and the animated properties show up with a blood-red background in the inspector.
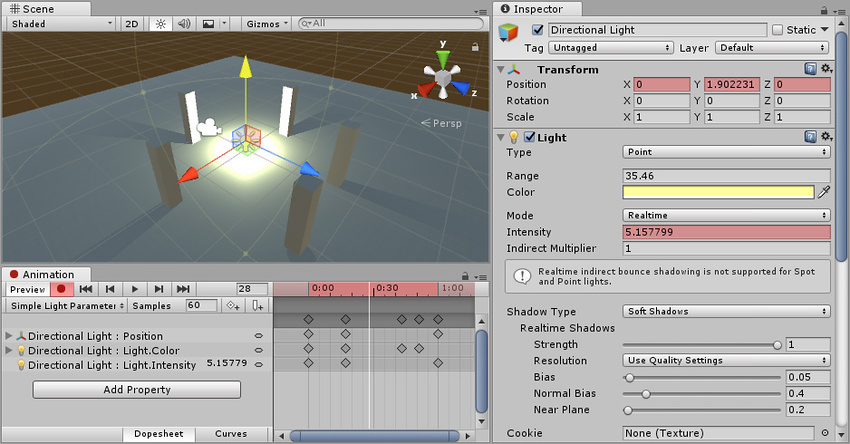
Yous can terminate the Record Fashion at any time by clicking the Tape button once again. When yous stop Record mode, the Blitheness window switches to Preview mode, so that y'all can still see the GameObject in its current position according to the animation time line.
You tin animate any holding of the GameObject by manipulating it while in Animation Tape Mode. Moving, Rotating or Scaling the GameObject adds respective keyframes for those properties in the animation prune. Adjusting values directly in the GameObject'south inspector as well adds keyframes while in Record fashion. This applies to any animatable property in the inspector, including numeric values, checkboxes, colors, and most other values.
Any properties of the GameObject that are currently animated are shown listed in the left-mitt side of the Animation Window. Properties which are non animated are not shown in this window. Any new backdrop that yous animate, including backdrop on child objects, are added to the property listing area as before long every bit you kickoff animating them.
Transform properties are special in that the .x, .y, and .z backdrop are linked, so curves for all three are added at the same time.
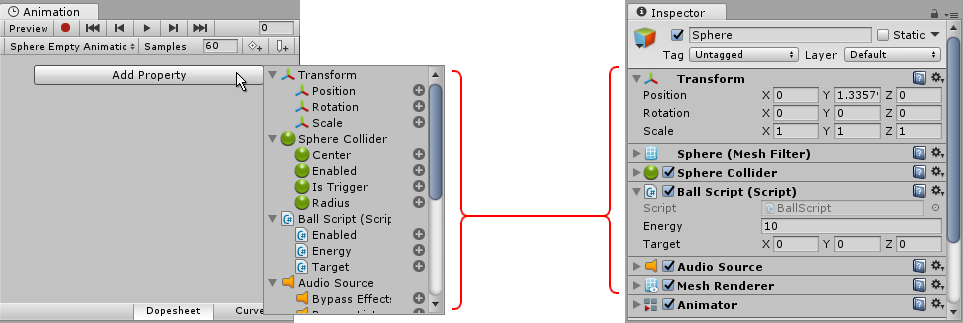
You can besides add animatable properties to the current GameObject (and its children) by clicking the Add Property push button. Clicking this button shows a pop up listing of the GameObject'southward animatable properties. These represent with the properties y'all tin can see listed in the inspector.
When in Preview mode or Record manner, the white vertical line shows which frame of the Blitheness Clip is currently previewed. The Inspector A Unity window that displays information about the currently selected GameObject, asset or project settings, allowing you to inspect and edit the values. More info
See in Glossary and Scene View An interactive view into the globe you are creating. Yous use the Scene View to select and position scenery, characters, cameras, lights, and all other types of Game Object. More info
See in Glossary shows the GameObject at that frame of the Animation Clip. The values of the animated properties at that frame are also shown in a column to the correct of the property names.
In Blitheness Mode a white vertical line shows the currently previewed frame.
Time line
You can click anywhere on the Animation window time line to move the playback caput to that frame, and preview or modify that frame in the Animation Clip. The numbers in the time line are shown as seconds and frames, so i:30 means i 2d and 30 frames.

Note: The fourth dimension line appears tinted blueish when in Preview mode, or tinted red when in Record fashion.
Creating keyframes in preview style
As well as using Tape mode to automatically create keyframes when you lot change a GameObject, you tin create keyframes in Preview fashion by modifying a property on the GameObject, then explicitly choosing to create a keyframe for that holding.
In preview mode, animated properties are tinted blue in the Inspector window. When you see this blue tint, it ways these values are being driven by the keyframes of the animation clip currently beingness previewed in the animation window.
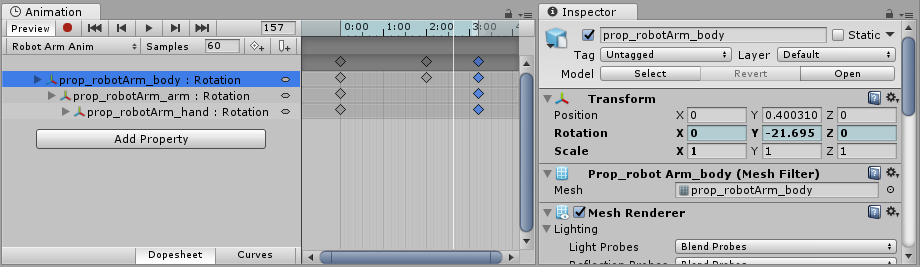
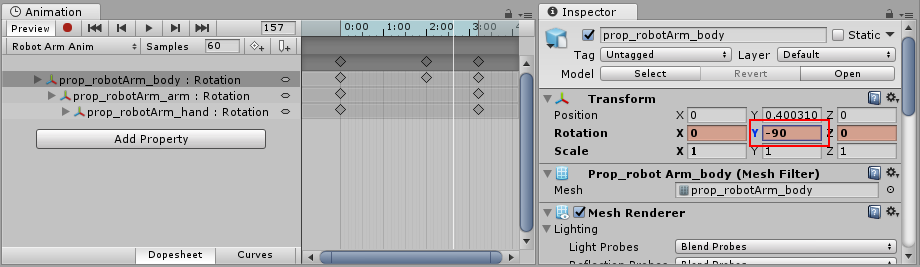
If y'all change any of these bluish-tinted properties while previewing (such as rotating a GameObject that has its rotation belongings animated, every bit in the in a higher place screenshot) the GameObject is now in a modified blitheness state. This is indicated past a change of colour in the tint of the inspector field to a pinkish color. Considering you are not in record mode, your modification is not yet saved as a keyframe.
For example, in the screenshot below, the rotation property has been modified to take a Y value of –90. This modification has not yet been saved equally a keyframe in the animation clip.
In this modified state, you must manually create a keyframe to "save" this modification. If you move the playback head, or switch your selection away from the animated GameObject, yous volition lose the modification.
Manually creating keyframes
There are three dissimilar means to manually create a keyframe when you have modified a GameObject in preview mode.
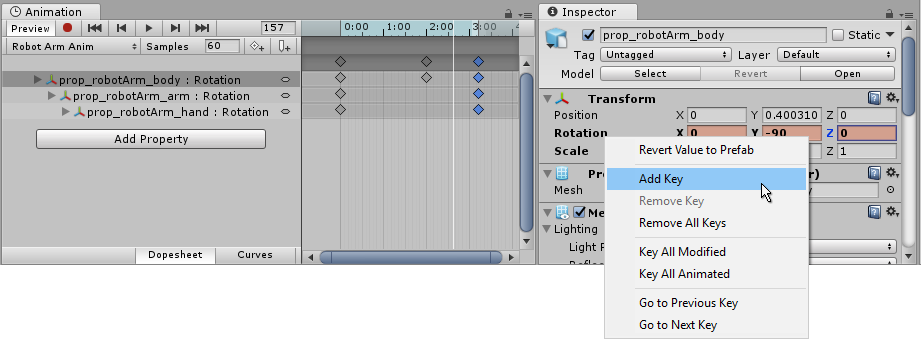
You can add a keyframe by right-clicking the property characterization of the property yous take modified, which allows you to either add a keyframe for just that holding, or for all animated backdrop:
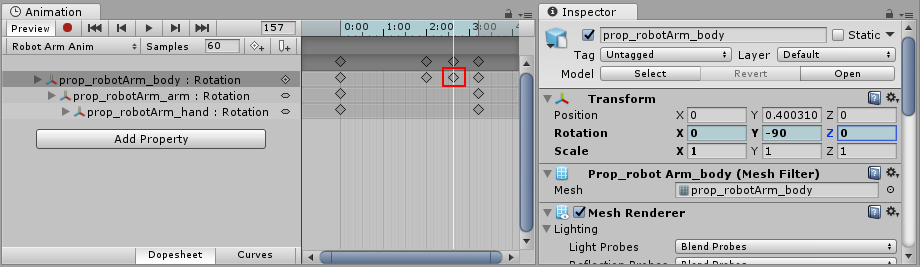
When you accept added a keyframe, the new keyframe volition be visible in the animator window The window where the Animator Controller is visualized and edited. More info
See in Glossary as a diamond symbol (called out in red in the screenshot below), and the property field will render to a blue tint, indicating that your modification is saved as a keyframe, and that you are at present previewing a value that is driven by the blitheness keyframes.
You can also add a keyframe by clicking the Add Keyframe push in the Animation window: 
Or, you tin can add together a keyframe (or keyframes) by using the hotkeys One thousand or Shift-Yard every bit described below:
Hotkeys
- K - Cardinal all animated. Adds an keyframe for all animated properties at the current position of the playback caput in the blitheness window.
- Shift-K - Fundamental all modified. Adds an keyframe for only those blithe properties which have been modified at the current position of the playback caput in the animation window.
-
2017–09–05 Page amended
-
Preview mode added in Unity 2017.i NewIn20171
Creating a new Blitheness Clip
Source: https://docs.unity3d.com/Manual/animeditor-AnimatingAGameObject.html
Posted by: hulettsircurnis.blogspot.com
0 Response to "How To Animate Character Modles In Unity"
Post a Comment